Say yes, say no! Things to consider when hiring a Wedding photographer in the Riviera Maya Mexico.

If you are planning to get married in a resort in Cancun, Playa del Carmen or Tulum and you want to book a wedding photographer there is some things good know upfront. In the following short blog post we use our experience as a local photography service to give you some insides.

What can you expect from us?

On your wedding day I will be capturing each and every special moment you share with your quests and with each other as a bride and groom. All important moments will be captured from preparations to the big 'I do' and anything that happens until the party is over. During the preparation of your big day I will be always making time to discuss details. If there is a dinner rehearsal the day before we are happily coming over to go through the major events with you, so that things go smoothly on the wedding day.

Picture what you want.

It is always helpful for any photography service to know more detailed what the client wants. On the other hand we can help you with time management and give you precise information how much time each part of the event will consume. Simple family pictures sound like an easy thing to do, but they require efficient organisation and usually eat up a lot of time.

Also take into account that the resorts and hotels of the Riviera Maya are enormous areas and getting from the beach ceremony to the dinner reception or even from the grooms to the brides getting ready residence might take valuable time off the clock. We can also include a second shooter for an extra fee - and we highly recommend doing that - to make sure every angle and moment is covered.

Mexico is hot!

When planning your wedding day don’t forget that we are in the carribbean and temperatures can be hotter than you are used to, especially when dressed in wedding attire. When your ceremony is taking place on the beach get it scheduled for the late evening. Anything between 5:00 and 6:00pm is a good time to start. Also you can be sure to have best light conditions for this important part of the day and your guests will be coming more relaxed to the dinner reception.

Bring your own wedding photographer, BYOWPH(?!)

If good wedding photos are important to you than you want to make sure that you will be able to bring a wedding photographer who’s style suits yours. BEFORE booking your venues location make sure you can bring your own photographer. As you will be spending your money there anyways you should be able to negotiate terms in advance. You are allowed to say no when not agreeing to what is offered to you, but say yes when the big moment comes!

@MYPLAYAPHOTOGRAPHER


Enhance your family & couple session with a clear idea.

Following article will introduce a few tips how to make your photo sessions magical by creating the momentum through good guidance. There is two goals that you should achieve in your session. First you should make your clients relax and feel comfortable in your presence. On the other hand you should try to push your clients out of their comfort zones. Here is how to get there.

Start your photo session slow

Every photo session needs some warm up time so don´t jump right into the actions shots. Connect with the client first, introduce yourself and ask about them or there prior experiences with photography. You will find out fast how comfortable they will feel in front of a camera. If they are new to the field try to relax with them . Don´t leave all to your client, direct them into the intimate moment that will make a good photograph. Ask them to turn the head slightly or move a leg forward slowly. The right choice of words is important to help convey the delicacy you need to take a good picture.

Photo shoot Cancun beach Myplayaphotogerapher

Introduce movement and keep moving yourself

Movement is crucial to get motion and emotion into photography. Make your clients have a walk along the beach and join them. Don´t let the subject just pass your camera. You can´t have a stationary attitude towards something that is moving. Walk around your clients and stay agile. If you usually like to shoot in situations where your subjects are illuminated by direct light from the front try to take their pictures also while backlit. Counter lightening usually more dramatic and sometimes gives you surreal results.

Photo session  Riviera Maya Tulum Beach Myplayaphotographer

You can even go further and make your clients run. It helps to release emotions and totally forget the camera. In case your clients are ready to get sporty try to motivate them like a fitness coach. Make the pull each other while running. If they are lacking in dynamics don´t hesitate to grab a clients hand to demonstrate. Just be careful not to push something the clients doesn’t really want to do as you never know the reason why a specific pose makes the client feel uncomfortable.

Photoshoot Myplayaphotographer XPU HA Riviera Maya Mexiko Playa del Carmen

You can dance!

In photography everyone is a good dancer. Make the client twirl and stretch arms and maybe you can even play a song through your phone. Tell them to bring tension to every part of their body and motivate your client to give it all. Don´t be afraid to suggest dancing poses even if you think you´re not good at it. Seeing that you are not taking yourself too seriously will help the client to open up himself. Also shouting commands like “more power” or “more drama” will help to get the energy you´re looking for. Remember that the more energy you bring into a shoot the more you will affect the outcome.

Photo shoot Playa del Carmen Riviera Maya Mexico

Everyone is special

Make your client see their beauty. Don´t be afraid to tell them what you like about their appearance. Compliments don´t only help to get good photographs you will also lighten up the clients day.

Photo shoot Tulum Riviera Maya Mexico

Take a step back

Take a step back and invite your clients to do the same. Finish the session by giving the client their own space. Operate from distance and snoop around working silently. Like this you will get good shots of trusted intimacy.

Photo shoot in a cenote Playa del Carmen Mexico


The correct exposure.

Making correct exposures is key to successful photography. Getting a well exposed image means that the correct amount of light is reaching the sensor. You might ask: what is the correct amount of light? When do I know my exposure was correct? 

Ansel Adams, an old master of landscape photography, wrote many pages about the correct exposure. He was the first human being figuring out how to capture the rising moon and a village at the same time, without the moon being over- or the village being underexposed.

Ansel Adams: Moonrise Hernandez, New Mexico.

Ansel Adams: Moonrise Hernandez, New Mexico.

Tip 1 - Studying the old masters will always improve your photography.

Some might think, what’s so special about this photo? He can easily have photoshopped it. Well, it was taken in 1941, 50 years before the rise of the internet and digital methods. Quite an astonishing discovery by Adams considering that, by the time he did that shot, photography already existed a 100 years! 

So what is the correct amount of light? Finding the correct exposure means finding the right balance between the very dark and the very bright parts of an image. What you always should try to achieve is having an image were the dark parts (called the shadows) and the very bright parts (the highlights) both still show details.

Tip 2 - Analyze your images under the aspect of brightness!

Over- and underexposed pictures.

Let me exemplify further. The following three images show a man I photographed in Cuba. 

The left image would be what is called „underexposed“ in terms of photography. The all in all impression is too dark, you hardly can recognise the man’s eyes, the details in the shadows are lost. 

Taxista_Cuba_Hasselblad500c.Portra400.jpg

The image in the center is correctly exposed. The overall impression is balanced. We are able to see all the details of the face. The blurred background of the building behind the man already starts to disintegrate into the white, but I don’t give it too much importance. When shooting a portrait, all you should care about is the face

Tip 3: Slightly overexpose the face, even if you loose details in the highlights of the background. 

The image on the right is obviously overexposed. Look closely at the mans forehead and the nose. Parts of it are completely white, there is no information at all. The structure of the skin disappeared and the color of the skin is gone. 

How does exposure works technically?

Imagine your photo sensor as millions of little buckets (instead of pixels) arranged in a rectangle. When no light hits the buckets they stay empty meaning they stay black (= no information). When you shoot your camera and light hits the buckets they are getting filled with information. If a bucket gets completely full it will be completely white (no information again). There is even the effect of overspilling; meaning the filled bucket will overspill and spill over on neighbour buckets turning them into white pixels. Your image will be partly „damaged“ or „burnt“ - what you loose is information and large parts of the image will stay white. You really want to avoid that, but you can’t avoid it always. We are just photographers, not magicians! 

How to influence exposure? The exposure triangle. 

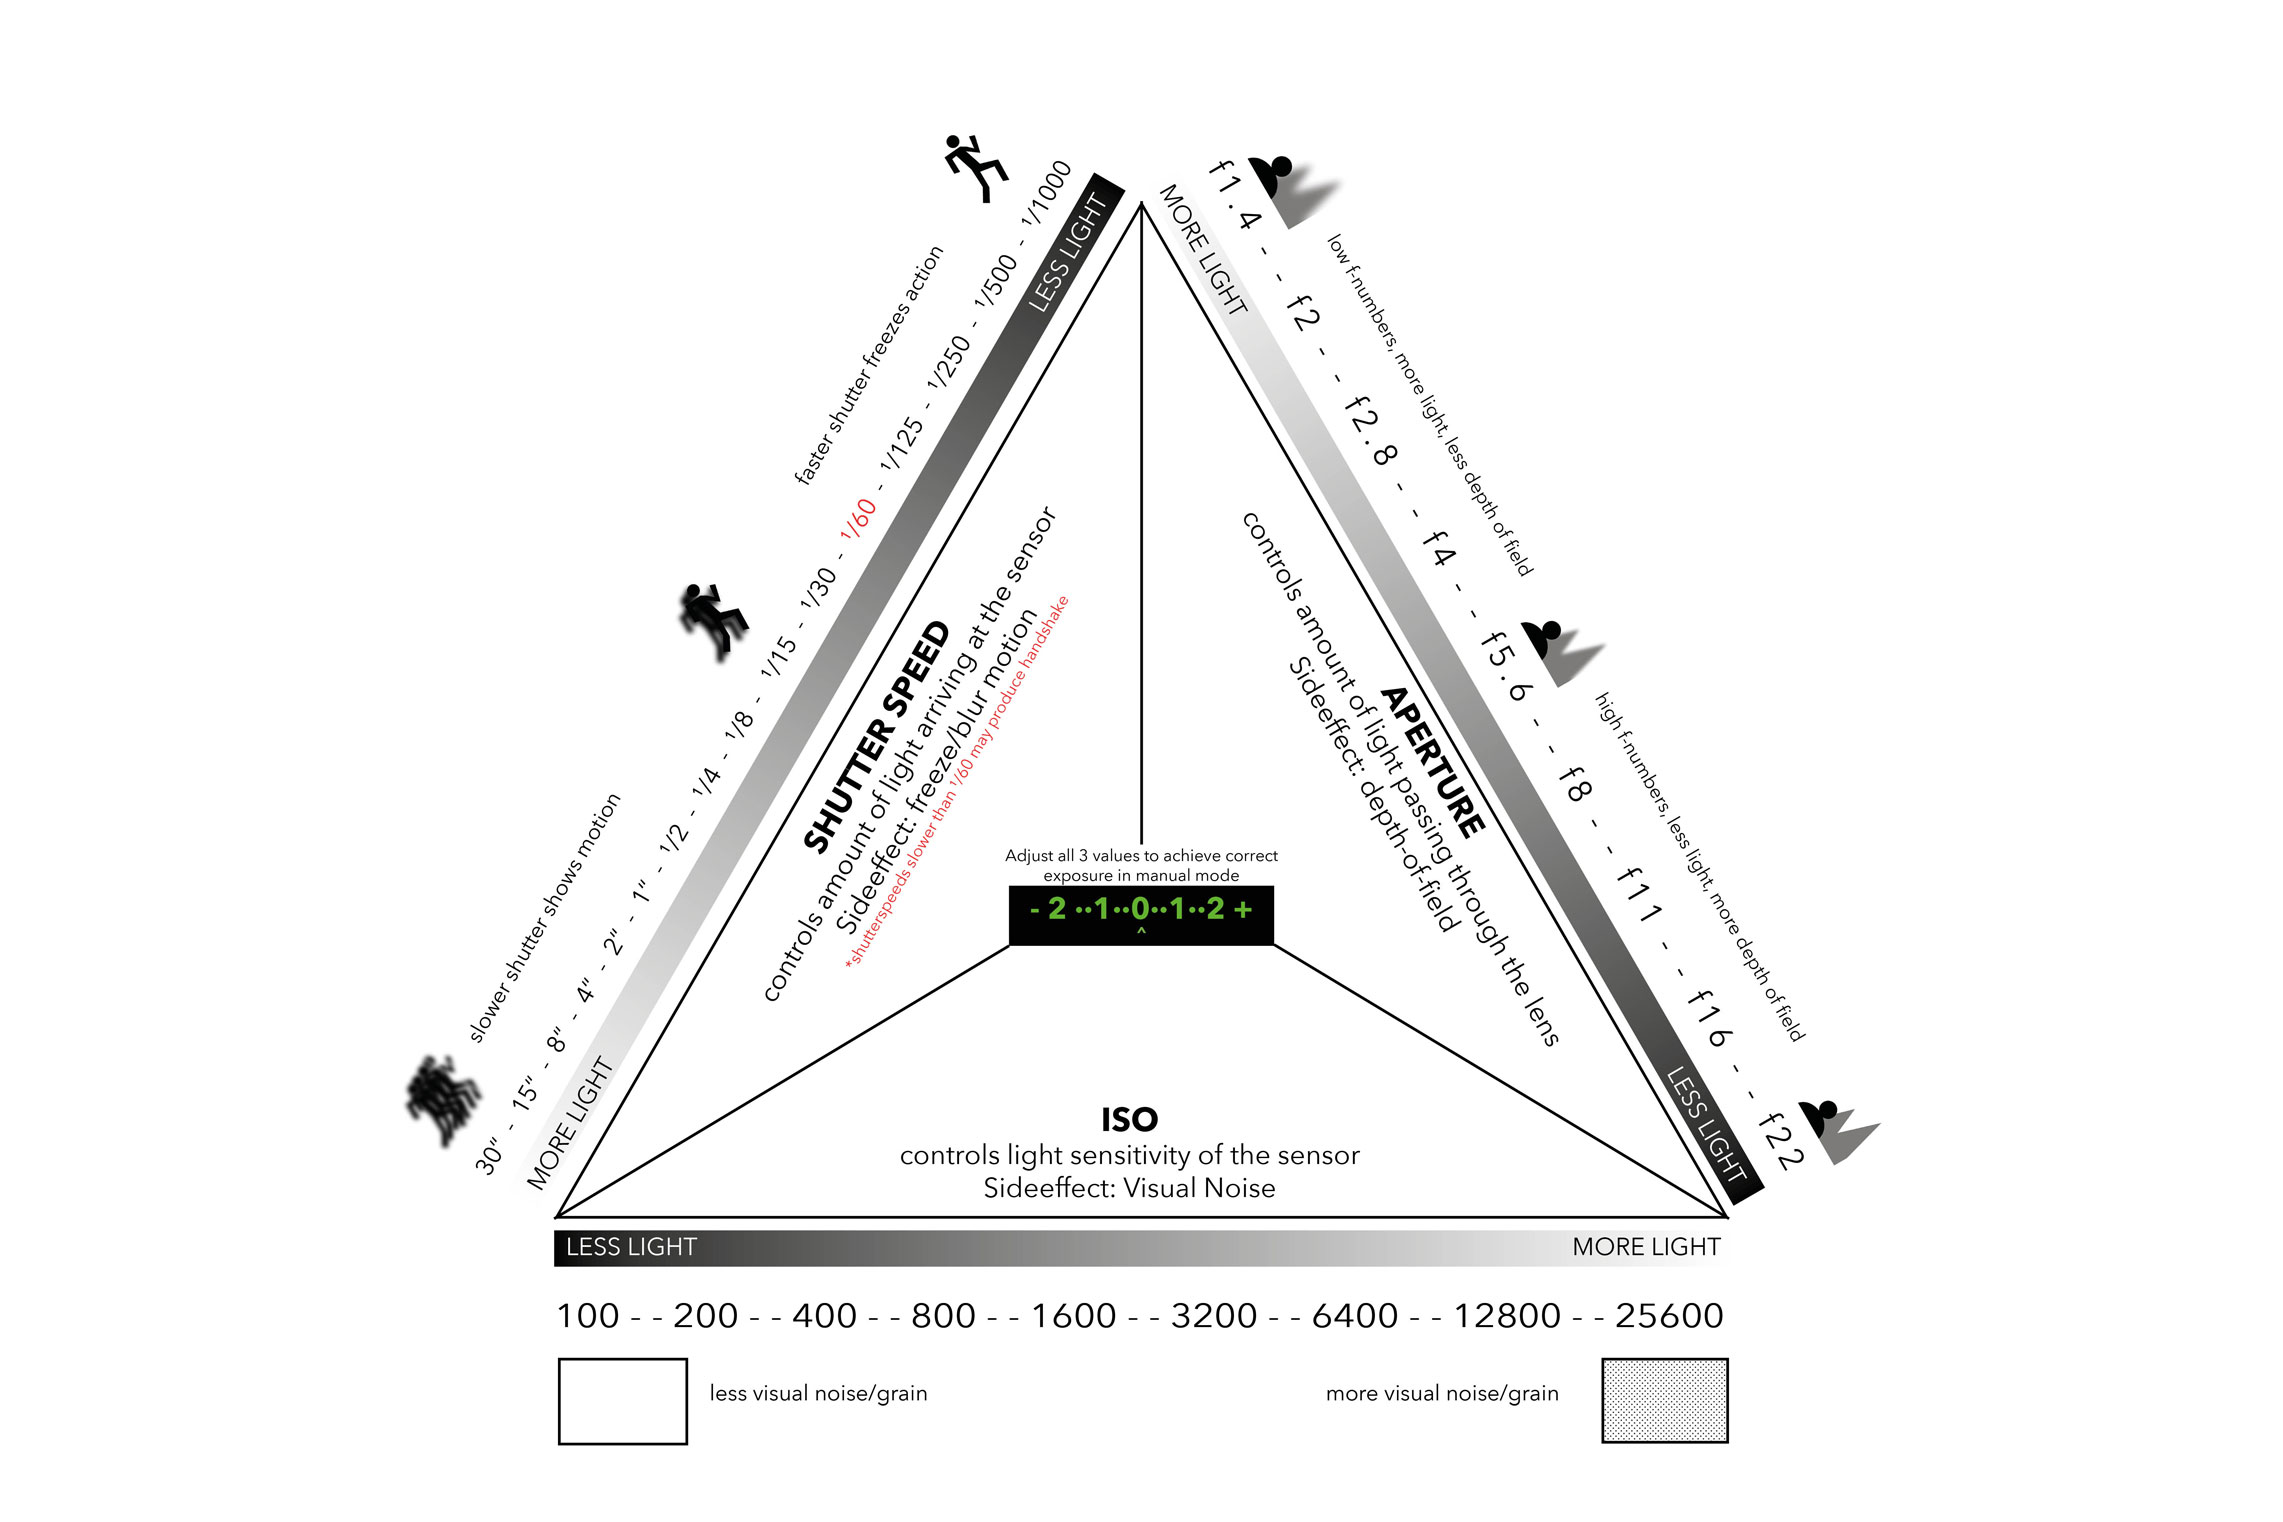
There is three key settings of a camera called the exposure triangle.

ISO

APERTURE

SHUTTERSPEED

If you think about starting to be a serious photographer, you need to learn how to control these three settings first. How to expose an image correctly depends very much on how you handle the exposure triangle. 

Exposure_Triangle_weboptimiert.jpg

The ISO signifies a specified value of your cameras sensor. The sensor is the rectangle surface inside your camera „recording“ the image. In digital photography you can make your sensor more or less sensitive towards light, just by turning a wheel. Small ISO-numbers like ISO 100, ISO 200 indicate that your sensor is not very sensitive towards light. The higher you push your ISO-values (ISO 1600, ISO 3200) the more sensitive the sensor will get towards light. Normally you apply lower numbers in bright sunlight and higher numbers in twilight or inside areas. Side effect: Higher ISO-numbers produce visual noise! 

ISO 100 ISO 200 ISO 400 ISO 800 ISO 1600 ISO 3200 ISO 6400 

NOTE: If you double the ISO value, you sensor reacts with light twice as fast! 

APERTURE. Every lens has aperture blades, which can hinder light passing through once they are closed. You can close them step by step, or open them again, if you want more light to hit your sensor. The steps are given in „f-numbers“. Keep in mind that smaller f-numbers (like f2) mean that the lens is wide open and therefore a lot of light can pass and hit the sensor. Bigger f-numbers (like f22) mean the opposite: the aperture blades are closed, less light will pass the lens! The creative side effect of opening or closing the aperture is what is called depth-of-field. Small f-numbers will have the effect, that only the object in focus is sharp and the background blurs (bookeh). With larger f-numbers you will have over all sharp images. Here the f-numbers in full stops: 

f1.4 f2 f2.8 f4 f5.6 f8 f11 f16 f22 

NOTE: If you stop down for a full stop (for example f2 > f1.4) double the light will pass through your lens. 

Tip 4: Learn these (full) f-stops by hard as they are irregular! There ist f-values in between but only memorise the classic f-stops listed above.

SHUTTER SPEED is the amount of time you let your sensor being exposed. Time is controlled by the shutter curtain, a cloth inside the body of your camera ready to open and close again. You push the shutter release, the sensor gets exposed, the shutter closes again, the picture is taken. In most modern cameras you have exposure times (=shutter speeds) ranging from 1/8000 up to 30“ seconds. Short exposure times allow you to freeze moments. Long exposure times give you the creative opportunity of motion blur. On the other hand long exposure times bring along the unwanted shake blur, in case you shoot handheld in lowlight conditions. The critical area for handheld shots starts with 1/60 or longer, depending on what camera and lens you use. Here typical times from short to long. 

1/1000 1/500 1/250 1/125 1/60 1/30 1/15 1/8 1/4 1/2 1“ 2“ ... 30“ 

NOTE: Half the time means half the light will reach the sensor. 

One Exposure, three ways! 

Every digital camera is equipped with a light meter that is instructing you how to set up your camera. Let’s make an example. Look at this street scene I shot in Havana. 

Havanna_Kodak_Portra_400_020_weboptimiert.jpg

I‘ve chosen a sensor sensitivity of ISO 400. My light meter proposed me to set my camera on a shutter speed of 1/250 and an aperture of f8. I am accepting these proposals as a time of 1/250 is short enough to shoot handheld and enough depth-of-field (=overall sharpness) for a street scene like this. Now have a look at this table I created. 

ONE_EXPOSURE_3_WAYS_weboptimiert.jpg

Depending on what you, the photographer, want to show us, you will choose different settings. In the photo- graph shown above I made a choice, which I thought was appropriate for this scene. If I would have chosen the last of the three options shown in the table, the blue car coming into the frame on the right would shown much more motion blur. Exposure settings always depend on your priorities. If your priority is to freeze action, then you need to set your camera on times of 1/250 and shorter. On the opposite: if you want to indicate motion, then chose longer exposure times. Same with aperture: If you want to isolate your object from your background open the aperture (f1.4, f2, f2.8), if you want high depth-of-field chose higher f-numbers (f8 and beyond). Usually you want to keep ISO-numbers low, as you want to avoid visual noise. With most cameras all values under ISO800 create acceptable noise. 

Tip5: Set your ISO first depending on the light, then adjust time and aperture! 

Sometimes you will be limited by the light available and reality will force you to opt for a specific setting, sometimes you will have more freedom in making a creative choice. In any case, photography keeps you occupied. 

Tip 6: Always know what your intentions are when taking a picture. 

Understanding the trinity of ISO, APERTURE and SHUTTER SPEED is the Pater Noster of photography. Once you internalised the exposure triangle you will be able to understand what your camera can do and even more important what it can’t do. 

I know, getting into photography can be overwhelming at the beginning, but hey, no-one said it’s gonna be easy. Please trust me when I say, it is totally worth the effort and time. You will understand that owning an expensive camera doesn’t make great pictures in itself. You will know why Ansel Adams was one of the most sophisticated photographers of its time and still outreaches most of todays landscape photographers. 

Keep in mind: once you inhaled und understood those rules, you can play with them. But first it is important to understand what your machine is doing once you push gently the shutter. Click! 


Photography Composition: How to Make Compelling Photos

What Is Photography Composition?

Photography Composition is a term for the formal structure of works of art. The term composition refers to the relationships between the elements of a photograph. These include:

  • The arrangement of figures or objects and their geometric relationships

  • Perspective and lines (real as well as imagined)

  • Principles of organization such as symmetry, grouping, structure, grid, and contrast

  • light and color

In this article, we’re going to explore a few examples where we can see different rules of composition coming to fruition. That way you can apply them to your own photography and start taking more compelling photos.

Rule-Of-Thirds

A very basic and well-known rule of composition is the rule-of-thirds. If you want to apply this rule simply divide the composition into thirds both vertically and horizontally, then arrange your subjects so they align with the intersections.

Let me give you an example with the following photo. See how the two protagonists are positioned exactly where the lines intersect? Applying this rule, you always place the most important subjects on top of the lines or where the lines intersect. Doing so will add balance to your photo. Some cameras even offer an option to overlay a rule-of-thirds grid over the LCD screen or viewfinder. Enabling this grid view in your LCD is a great way to rain your eye to compose better.

Rule of thirds method is about placing important objects or lines along or intersections of the rule of thirds grid.

Rule of thirds method is about placing important objects or lines along or intersections of the rule of thirds grid.

In addition to the composition, I like the content of this photo as it refers to our blind spots. Only I am aware of the smiling girl behind the corner while taking the picture. The second photographer depicted in this image is, on the other hand, aware of something I am not aware of. Look at his gaze drawn to something outside the frame and look at his open mouth. It looks like he spotted something!

Golden Triangle

A little more dynamic than the rule-of-thirds is the rule of the golden triangle. The concept derives from the “golden section,” in which mathematicians, architects, and artists have discovered the ideal ratio for design is 1:1.618. They have found this ratio throughout nature, man-made objects, buildings, and other forms of classical art.

So, how do you construct it and apply it to your photography? First, you draw a diagonal line from the bottom-left of the frame to the top-right. Then draw another diagonal line that intersects the first line at a 90-degree angle. It’s called the perpendicular line. Note that you can also do this the other way round! Again, put the objects deserving attention in the intersection points or let their outlines follow the imaginary lines we just drew.

Here is a rather mean example. It shows a market situation where two people seem to negotiate over a girl. The facilitating truth is, (of course!), that the seller just offers a mirror so the young girl can see herself, but the way of the composition offers the first mentioned interpretation. Observe how the important details are aligned along the crossing diagonal! The seller and his stretched arm, the small girl in the mirror and the money counting hands of the buyer. With composition, you can influence the way you want your image to be understood!

An image composed using the Golden Triangle.

An image composed using the Golden Triangle.

Leading Lines

Another way to compose your photos is through leading lines. See in the following photo how all the important lines lead to the centered protagonist on the bike. Leading lines have the purpose of creating perspective by leading the eye into the image. Further, you can use them to point something or someone out.

A photograph of a cyclist in the middle of the screen with many leading lines pointing towards him.

A photograph of a cyclist in the middle of the screen with many leading lines pointing towards him.

Another example of using leading lines in your composition.

Another example of using leading lines in your composition.

As our eyes are trained to read from left to right, try to compose pictures with lines hindering your eye from jumping out of the frame too fast. For example, it’s better to compose a mountain range entering in the bottom left and ascending to the top right rather than the other way round. Of course, you can have lines running from the top left to the bottom right, just make sure you have elements that stop the eye before it leaves the frame.

Your eyes are trained to look from left to right.

Your eyes are trained to look from left to right.

Composing with Color

If you shoot mainly in color, consider there are certain colors which work better together. According to color theory, introduced by the German writer and poet Johann Wolfgang von Goethe in 1810, there are colors which are complementary, with the effect of boosting each other’s intensity when displayed next to each other.

Goethe’s Color Wheel

Goethe’s Color Wheel

Thus, the colors shown in the circle above create the strongest contrast with the color on the opposite side of the color wheel. Red goes best with green, orange pops out the blue, and purple is the complementary color of yellow. If you want to draw attention to your images, search for those color contrasts!

Conclusion

Of course, there are many more ways to compose than just those mentioned. You can play with bright/dark contrasts or you can implement letters and incorporate words and road signs to make your image more interesting.

The composition can underline your “message” so it’s smart to be aware of it. But, in my reality as a street photographer, I don’t think too much about the rules once I’m out there. Life happens too fast and good photographers will apply them intuitively without thinking. In fact, I am sure that in almost all the examples shown above I didn’t even think for a fraction of a second on composition rules. It’s good to know the basics, but there’s also a lot to be said for shooting with your heart and following your intuition.

Let me finish with what Edward Weston, photographer, and co-founder of the famous f/64 Group, said:

Consulting the rules of composition before taking a photograph, is like consulting the laws of gravity before going for a walk.
My Playa Photographer in the streets of Havana


Composition makes the photography stunning work of art. It's a learning exercise for beginners to understand the rules of composition. Here's another useful resource to read for tips and techniques on photography composition.

For additional information, take a look at the article on “Using Golden Ratio in photography” from the Pixpa blog. It offers some good information for photographers looking to improve their photography composition.

Controlling Shutter Speed with your Camera

The following article is a small guide for those who consider to shoot their cameras manually. As you give away responsibility when putting your camera on auto-mode, I highly recommend you to bother about learning to set up your camera. Besides the manual mode „M“ there are different half manual modes (priority modes / Tv, Av, P) worth considering. Getting used to priority modes is not as complicated as you think and it has clear advantages: the influence on what your camera is doing will be much higher than in auto-mode, thus your results will be much more satisfying.

The three major parameters you can control in a camera are the exposure time (shutter speed), the aperture of your lens and the sensitivity of your sensor (or film) towards light. Here we try to concentrate just on one major aspect of the exposure triangle (ISO, APERTURE, TIME), the shutter speed.

The principle of shutter speed

As the name already suggests the shutter speed defines how fast or slow the shutter mechanism of your camera is opening and closing again. The shutter stays closed until you fire your camera. What happens when you shoot is that a shutter curtain opens, and the sensor gets exposed to light, the moment you framed is captured, the shutter closes again. All that happens in the amount of time in which you set up your camera. Classic shutter speeds (exposure times) from short to long are:

1/1000 - 1/500 - 1/250 - 1/125 - 1/60 - 1/30 - 1/15 - 1/8 - 1/4 - 1/2 - 1“ - 2“ - 4“ - 8“ - 15“ - 30“.

I marked the shutter speed 1/60 in bold letters because the risk of producing blurry images through handshake increases from that exposure time on.  This assumption doesn’t count for all cameras. With heavier cameras and bigger lenses attached you might even produce handshake at 1/125. With lightweight point-and-shoot cameras or rangefinders you can achieve sharp results even at 1/30 or 1/15, in case you have a steady hand.

Why should you control exposure time?

Decide yourself if you want to freeze action or if you want to indicate movement through motion blur! Two examples:

Action is frozen in the left image. Clear motion blur in the dancers legs of the right image.

Action is frozen in the left image. Clear motion blur in the dancers legs of the right image.

The image on the left shows a street scene in Havana. My camera was set on a film speed of ISO 400. The aperture I prefer during the day is usually somewhere in between f5.6 and f16, depending on the amount of light. Here it was set to f5.6 and to get exposure right, the shutter speed was set to 1/250. As result my camera froze the moment just when the girl starts to run out of her hiding place.

In the right image you can observe the effect of motion blur.  A photo day in Mexico City came to an end, music was played and people were dancing salsa. One energetic dancing couple caught my attention. The dimmed light condition only allowed me to shoot with a shutter speed of 1/30 at ISO400 and my aperture was wide open at f2.8. Because of the long exposure time the movement of the men’s twisting leg is visible as motion blur inside the image.

Use shutter speed creatively

I just chose these two very simple examples to demonstrate the effect of shutter speed. However you can be much more extreme in your creativity. Let me show you one of the longtime exposures that struck me. A helicopter taking off  photographed by the old master, Andreas Feininger.  The timeframe of the image is most probably somewhere in between 30 seconds and a minute. You can see the helicopter rising as the illuminated rotor blades are ascending concentrically. Controlling time gives you plenty of options getting creative.

Andreas Feininger

Andreas Feininger

Chose priority modes before going manual

If you understood the principle shutter speed but you are still afraid to shoot all manually try the following. All digital cameras offer the priority mode “Tv” (= shutter priority on a Canon, with Nikon it is the “S”-Mode). In this mode you simply adjust the time you prioritise and your camera will set all the other parameters for you to get correct exposure.   

To get better in photography it is important to check your settings before you shoot and also in revision of your photos on your computer.

This article is a brief reminder of what you can do with a camera. Photography is not just pushing a button. A camera is a tool to express yourself and the better you understand the technology and mechanics behind it, the more options you will have to tell us your story.


Complete DSLR Guide That Will Get You Amazing Results from Your Camera

Introduction

Lot’s of folks new to photography live with the illusion that they can purchase an expensive DSLR and it will automatically get nice pictures for them. Disappointment spreads some days after the buy as the buyer realizes the complexity of their new tool. Overwhelmed with the number of buttons and the complexity of the official DSLR guide booklet, the purchaser gives up. The camera ends up being an opportunity for more ambitious photographers on eBay.

Sounds familiar?

In this DSLR guide, we want to change that and explain, in simple terms, how to get the most out of your expensive purchase.

We recommend you read the rest of this guide with your camera nearby so you can test and confirm where buttons and dials are located in your model.

Hopefully, you will decide to keep your DSLR and enjoy photography.


The basics of DSLR

Understanding the basics of your new DSLR will help set yourself up for success. However, be aware, I’m just mentioning the major settings of a DSLR since I want you to go deeper and practice yourself. If your camera model looks different to the one shown below, don’t be deterred! The settings and buttons I mention in this text are very similar to the camera you own!

A photo of a DSLR camera without the lens attached, showing the camera sensor

A photo of a DSLR camera without the lens attached, showing the camera sensor

Camera Sensor

Every DSLR has a camera sensor. The sensor is the medium that is “recording” your image once you press the shutter button. What was Film in analog photography, is a sensor in digital photography. Most DSLR cameras have an APS-C sensor (cropped-frame) or a full-frame sensor. The bigger full-frame sensor has the same size as a 35mm negative in analog photography.

Why is bigger better? The answer to that lays in enlargement. APS-C sensors are a bit smaller and offer less image quality. Blowing up your image to 100×70 cm from a bigger surface, such as the sensors found on full-frame cameras, will result in better images with more details than enlarging it to the same size from a smaller surface (APS-C). In other words, it’s similar to blowing up a balloon. The vibrant red of the empty balloon will lose it’s intensity once you put air in it.

Tip: Don’t go running to the store to buy a full-frame camera! Your APS-C cropped sensor can take amazing photos!

Shutter button

If you push this button half way down your camera will start focusing and beeping when the desired object is in focus. Push it all the way down to fire your camera. Remember, in most DSLRs, this button is a two-step function. Most beginner DSLR owners press the shutter immediately without much thought as to the first step, focusing.

Practice: Turn on your camera now and aim it at an object. Press the shutter half-way down and observe the lens movement, focus beep, and focus achieved signal (usually a solid green light on your viewfinder, if it is flashing, that means focus was not achieved)

Lens release

Push the lens release button to switch lenses. Hold it down while detaching the lens. When you want to put a new lens to your camera, align the red or white dot on your lens with the dot on the camera’s metal thread.

Practice: Hold the lens release button and remove your lens by turning the lens counter-clockwise. Then put it back on.

DOF preview

What is DOF? In simple terms, DOF (depth-of-field) refers to the focus pane of your shot. Everything inside focus pane will be in focus. Everything before or after the focus pane will be out of focus.

The DOF preview button helps you determine what photos will look like before you push the shutter. Many beginner photographers don’t realize the image they are seeing in the viewfinder does not necessarily have the same depth of field as the image they are about to take. This is because the camera automatically gives a preview of the image at the camera’s lowest possible aperture setting. So if you’re shooting on a narrow aperture, say f/8, on a lens that can stop down to f/1.8, the image in the viewfinder will display at f1.8. That’s a big difference in depth of field from f/8!

However, you can press the DOF button and the lens will stop down to the aperture that you have set. Then, you will be able to see a preview of what the final image will look like through the viewfinder. As depth-of-field defines what areas of your picture stay sharp, the button is good to help show you which elements inside your image are sharp and which ones will fall off to blur.

Practice: Set a higher f-number in your camera such as f/11 and focus on an object around you. Then look through the viewfinder while pressing the DOF preview button. Do you see the focus area change as you release the DOF Preview button?

Pop-up Flash Button

Most DSLR cameras include a built-in pop-up flash. Push the button and the flash on top of your camera will pop up. You can hide the flash again just by pushing it down manually.

Practice: Press the pop-up flash button to release the flash.

Back of a DSLR camera

Back of a DSLR camera

Hot Shoe

Besides the built-in pop-up flash, every DSLR offers a hot shoe. You can use the hot shoe to attach a more powerful external flash or other gear and accessories to increase the functions of your camera. For example, remote triggers or perhaps a microphone when taking videos. This is usually located just behind the pop-up flash. You can identify it by the metal connectors as shown.

The Viewfinder

Almost needless to say, looking through the viewfinder will allow you to see the image you are about to take. The nice thing on a DSLR is that you actually see through the lens. Thus you can see the final image with high accuracy. Furthermore, looking through the viewfinder, you will find a small display showing the major exposure settings.

As you can see in the viewfinder image below, exposure control shows that, with the settings of ISO800, f4.5 and 1/25 shutter speed, I would underexpose my dog by almost two stops. Also, note the small square (focus point) right next to his leg indicating that I would focus wrong! The square should be on his eye, as I want sharpness there, not on the blanket. Last but not least, you can see how much my dog loves it when I’m writing the blog instead of playing with him.

Look through your viewfinder and identify the numbers shown

Look through your viewfinder and identify the numbers shown

LCD Screen

The LCD Screen allows you to see your masterpieces right away just by clicking the small “>” play button! Further, the screen gives you more information about your image. It show’s the chosen exposure setting like ISO, aperture, shutter speed, and many more things. Also, the LCD screen is where you will access your camera’s ever important menu system.

Practice: Take an image and press the ‘Play’ button to view it in your LCD screen.

Live View Switch

Most DSLR’s allow you to compose an image either by looking through the viewfinder or by live view on your LCD screen. Push this button to switch from one view to the other. Although I prefer composing through the viewfinder, live view has a clear advantage: you can check sharpness with an electronic magnifying glass. To switch back (turn off live view) you can press this button once more.

Practice: Press the Live View Switch button a few times to switch between the viewfinder and live view preview (LCD).

Quick Control Dial

The quick control dial has several functions. By turning the wheel you can rush through your pictures in play-mode. While shooting in manual mode, it allows you to change the aperture or the ISO depending on how you set up your camera.

Most of the wheels and buttons are customizable and that’s a good thing! Once you learn to handle the camera you can customize it the way it works best for you. The goal is that your fingers melt with the major buttons of your camera. Most camera bodies have very well thought out ergonomics and, after a while, you will handle them intuitively.

Practice: Press the ‘play’ button and turn the ‘Quick Control Dial’ clockwise and counter-clockwise to go through your photos in LCD. Half press the shutter button to switch back to shooting mode and turn ‘Quick Control Dial’ to see which settings change (look through your viewfinder)

Multi-control

This button, located in the middle of the Quick Control Dial, allows you to jump through the menu. In shooting mode, you will most likely use it to move your focus-point through the viewfinder. Both, multi-control and quick control dial are operated with the thumb.

Practice: Find the AF-point (autofocus point) button (in our example, it is located to the left of the Exposure Lock Button) and press it. This will highlight the current focus point(s). Then use the ‘Multi-control’ button to jump from focus points.

Exposure Lock Button

I love this one! The * allows you to freeze a certain exposure. The most useful tip I ever got for street-photography on a cloudy day was to measure the light on the street. Just point your camera at the asphalt and push the exposure lock. Your camera will remember the luminance of the street and you will get astonishingly correct exposures as the light on the ground is a very steady reference for your light meter.

Tip: after each shot, your memorized exposure will reset. So if you want a specific exposure for the next shot, take exposure again from the desired object by focusing on it and pressing the ‘*’ button, before taking the shot.

Practice: Focus and lock the exposure on a relatively dark object/area. Then take a photo and observe how the camera made the shot bright. Camera locked the exposure so that our dark object/area is well lit. You can do the same with a bright object/area.

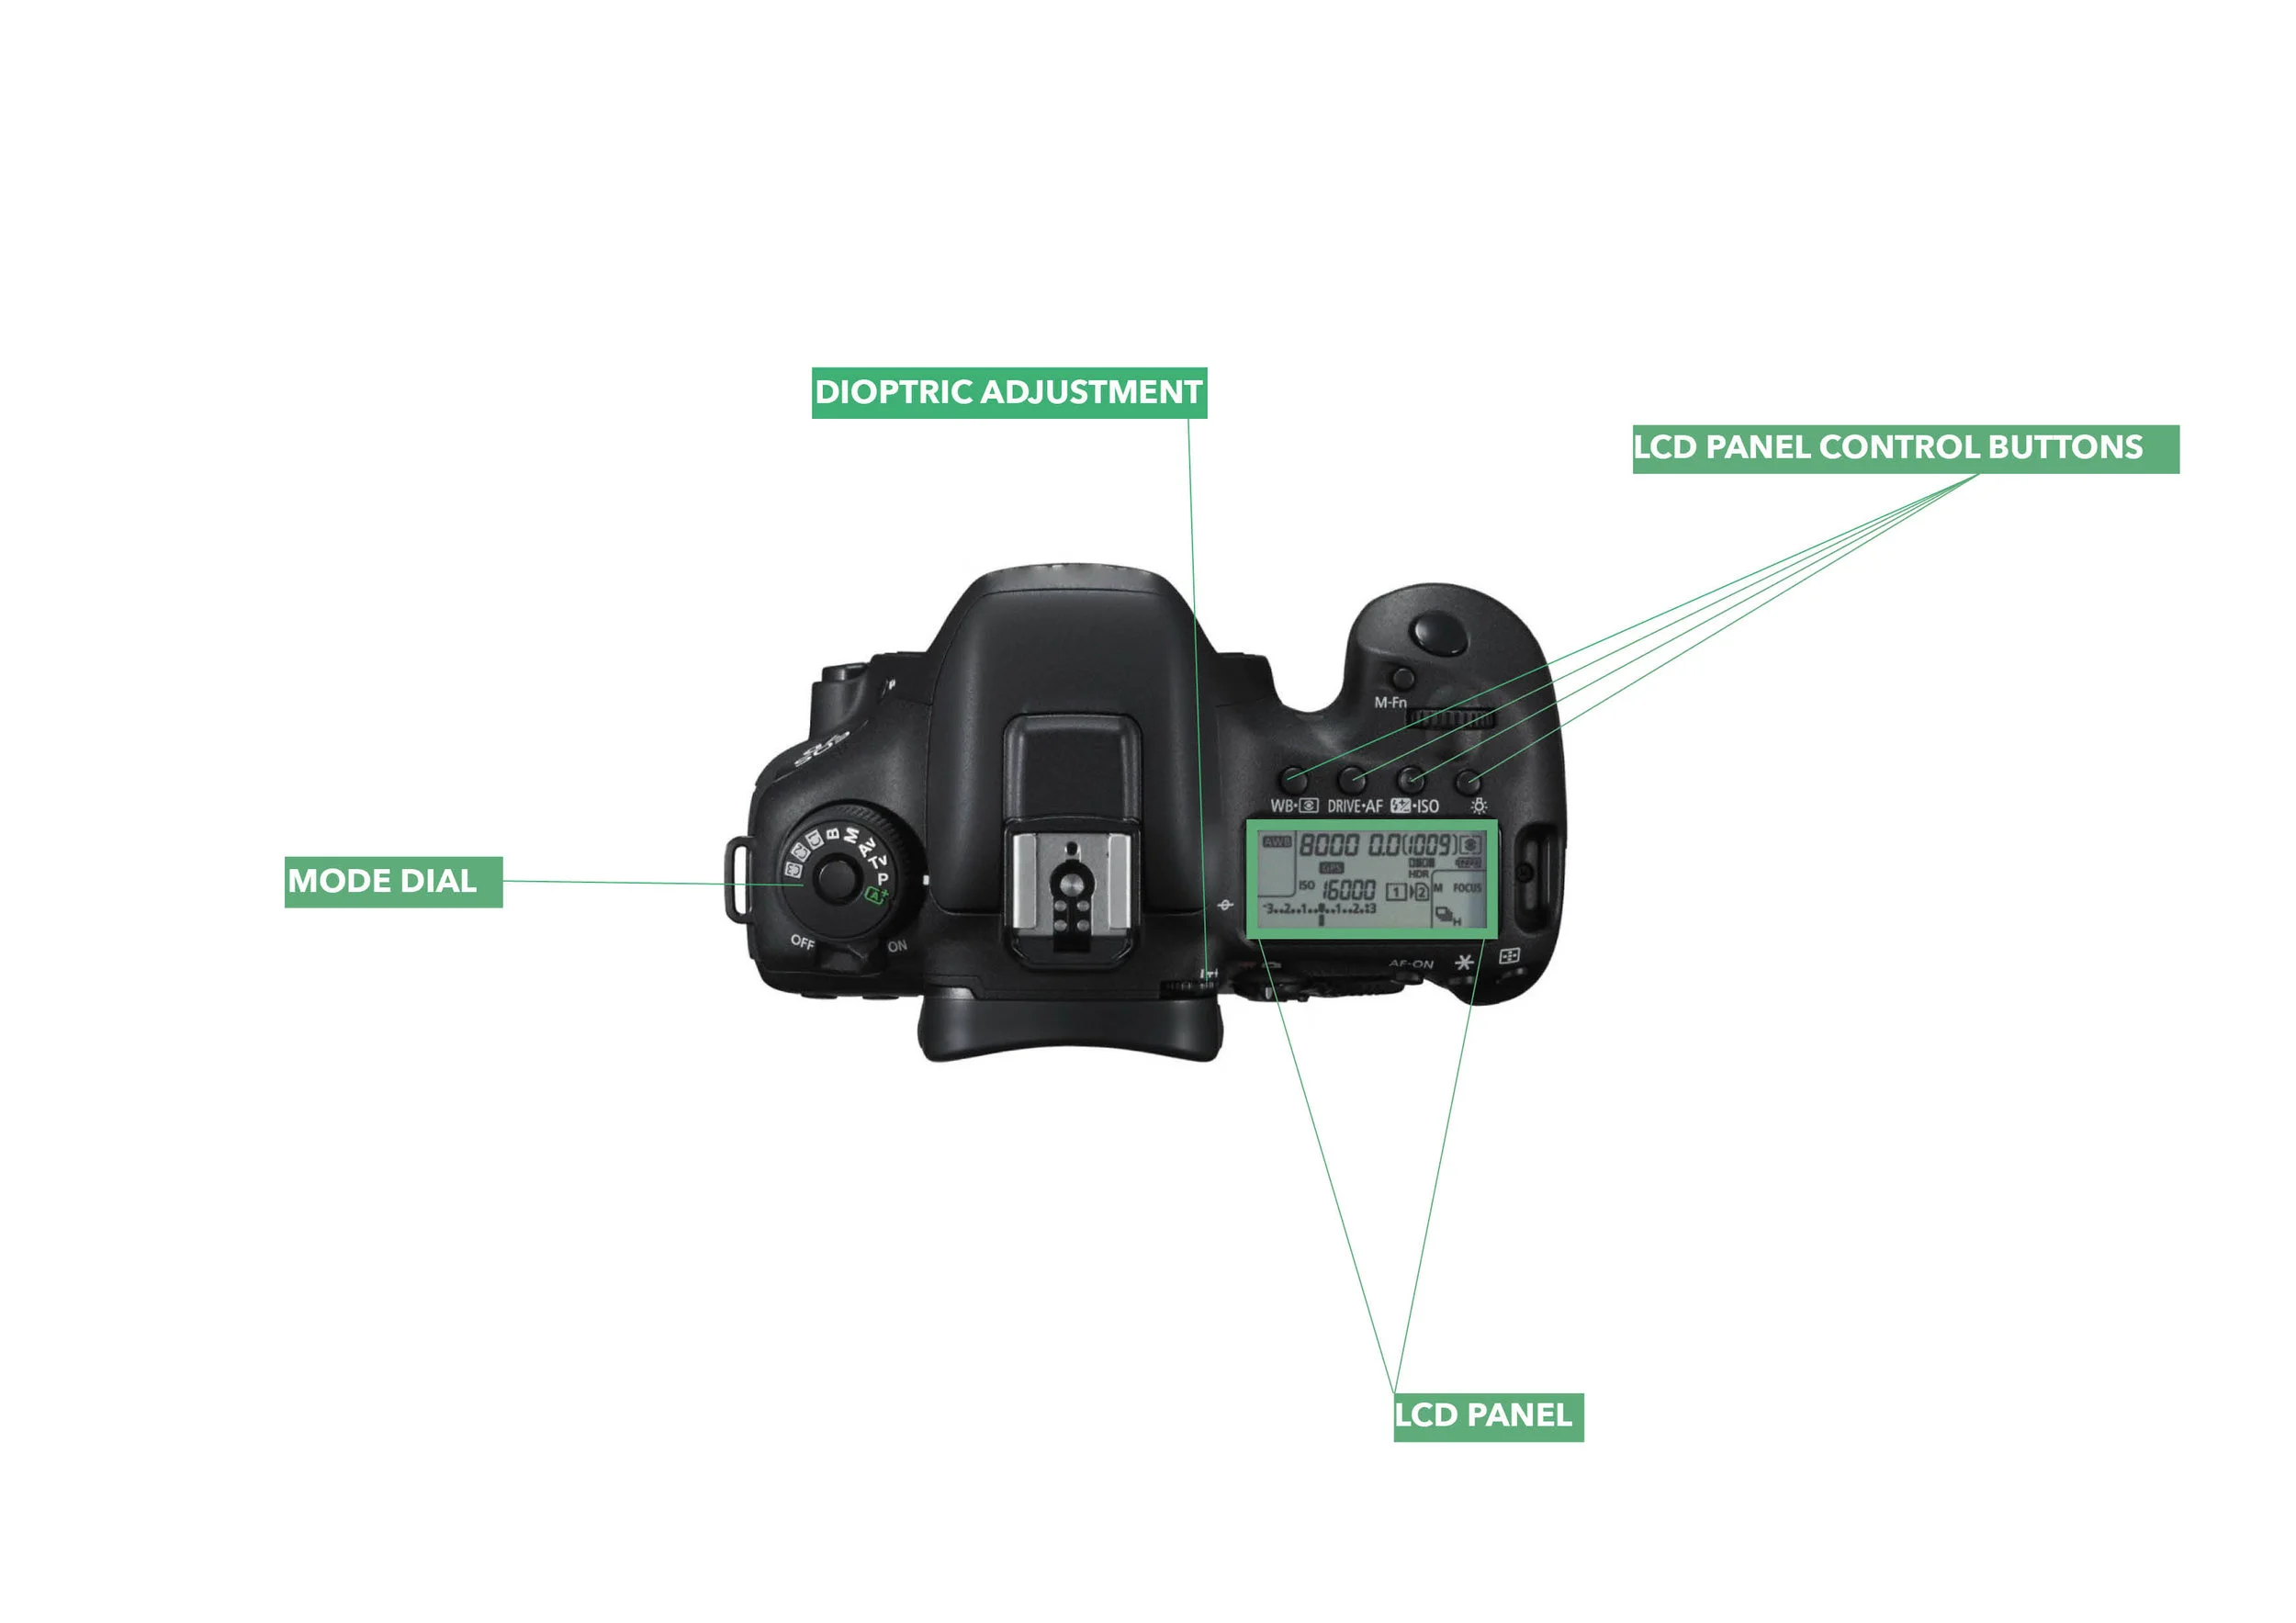
The top view of a DSLR camera

The top view of a DSLR camera

Dioptric Adjustment

Another very helpful feature of your DSLR is the little dioptric wheel. People who normally wear glasses can adjust the wheel to their vision. Another useful tip I got was to remove the rubber eyecup from the viewfinder. It allows you to get closer to the hole and have a better view.

Practice: Look through the viewfinder and adjust the Dioptric Adjustment to see how your focus points go in and out of focus. Set this to a level where focus points are sharp.

Mode Dial

Model dial selects the programming mode for the camera. If you Turn the dial to A+ (AUTO), your camera will automatically choose all the settings for you. However, I’d strongly advise anyone against using this mode as you give away all the responsibility. When shooting in AUTO mode, you are not being creative and run the risk of not getting your desired shot.


All beginner photographers should start using one of the semi-manual or manual modes:


Semi-Automatic Program Mode (“P”)

Shutter Priority Mode (“Tv” on Canon or “S” on Nikon)

Aperture Priority Mode (“Av” on Canon or “A” on Nikon)

Manual Mode (“M”)

Bulb Mode (“B)


The “P” mode and priority modes are autoexposure modes, which means your camera automatically adjust one or more parts of the exposure triangle to achieve the desired exposure. Choose the “M” mode if you want the full control of the camera.

Still feeling confused by what all these modes do? Let’s go into a little more detail since it’s important you know when to use each of the different modes.

Semi-Automatic Program Mode (P)

P stands for program-automatic. Here the camera chooses aperture and shutter speed for you as soon as you press your shutter half way down. Since you can still change the aperture/shutter speed combination by turning the wheel right next to the shutter button, the P-Mode is superior to the fully automatic mode. If you are still using automatic mode, you may want to start with this mode to see how aperture and shutter speed affect your photos.

Shutter Priority (Tv/S)

In this mode, you choose the shutter speed manually. Depending if you want longer exposures times to show motion blur or shorter exposure times to freeze motion, you will choose either slower or faster shutter speeds. Your camera will automatically set the aperture to get the correct amount of light on your sensor (exposure). This mode is great if you are shooting sports or want to introduce motion blur to your photos.

Practice: Turn your mode dial to Shutter Priority mode and select a fast shutter speed like 1/500 second. Take a shot of a moving subject (a child, pet, pedestrians) and attempt to freeze motion. Increase the shutter speed if you have to. Then, try with a slower shutter speed and capture motion blur.

Aperture Priority (Av/A)

Most of you who will start shooting in advanced modes most likely will end up in “Av” in 90% of the time and that’s ok! Here you choose the aperture yourself and the camera adjust the shutter speed to get the desired exposure. BY settings the aperture manually, you are in creative control of things like isolating your subject with a blurry background or an image with overall sharpness. Use this mode if you are shooting landscape (large f-number to get a higher depth of field) or portraits (lower f-number to get a shallow depth of field, thereby a blurry background)

Practice: Turn your mode dial to Aperture Priority mode and select a large aperture (small f-number like f/2.8) and attempt to blur the background in your photos. Then turn the dial up to something like f/11 in an attempt to have your background in focus as well.

Manual Mode (M)

With “M” mode, you operate your camera manually and have the full control. When shooting wedding and events, (most likely with a flash) it’s inevitable to use manual mode, as light conditions change constantly. Even if you have time, like in landscape photography, manual mode is the fastest and safest way to go. Adjust your settings until you get the exposure right. And always check your screen and histogram to judge if you got it right!

Tip: Being forced to be aware of your settings and exposure makes you learn rapidly. Plus, you become more creative by having the full control.

Practice: Turn your mode dial to manual mode and start with f/2.8, 1/500sec, and ISO 100. Is your photo overexposed? Try to correct the exposure by adjusting either shutter speed or the aperture. Don’t be afraid to take 20 shots if you have to, it’s free!

Bulb-mode (B)

B stands for Bulb-mode. In this mode, your camera will expose the sensor as long as you hold down the shutter. Why is this useful? As most DSLRs only offer shutter speeds up to 30″ seconds you will use the bulb mode in case you want to expose longer than that. When using Bulb mode, your camera should be mounted on a tripod and you must fire the shutter with a remote control to avoid camera shake.

Use this mode to get a ghost effect (make moving objects invisible) on busy landscapes or smooth out water, clouds…etc.

Practice: Turn your mode dial to Bulb mode and mount your camera on a tripod. Aim to create motion blur (traffic, pedestrians, spinning objects, flowing water) by pressing your shutter speed as long as you want. You will be amazed by the results!

Custom Modes

In Cannon DSRL there are custom mode selectors (C1, C2, and C3) that you can pre-adjust and save all your settings.  For Nikon users, in your settings menu, look for a setting named “Shooting Menu Banks” where you can store all your settings under a custom shooting mode name.

Custom modes can be extremely helpful if you are often changing to the same settings. For example, if you do a lot of studio work where you frequently use the exact same lighting setup, you may find them useful. Another example is if you are shooting wildlife. Here, having all your settings in one custom mode allows you to quickly load them all at once and start shooting.

Use The LCD Panel To Set Up Your Camera

Last but not least, I want to give you a brief overview of the LCD panel (usually located on the top). Here you have all the important settings at sight. Illuminate the panel by pushing the light bulb button on the top right.

DSLR camera’s LCD panel can quickly give you information about the settings you are using

DSLR camera’s LCD panel can quickly give you information about the settings you are using

What can we see in the panel shown above?

My shutter speed is set on 1/125 of a second, the aperture is f3.5, and the ISO is 800. I have 1027 pictures to go until my memory card is full. Additionally, the white balance (WB) is switched to tungsten light.

  • WB is a color correction tool. You can choose from different WB settings (daylight, shade, cloudy, flash,…) depending on what your major light source is. The result of correct WB is natural looking colors in your image.

  • Picture format I am using is RAW. You can choose RAW or JPG. As the RAW format saves much more information, I highly recommend you to shoot in RAW.

  • Metering mode is set on “centered metering”, meaning my camera will measure the light arriving in the center of the image and calculate an average for the whole scene. Please read more about metering modes in your camera manual as it is essential to photography!

  • Drive-mode tells you if you are about to fire a single shot or a series of pictures or if you’re using a self-timer.

  • Exposure level indicator can be found on the LCD panel and inside the viewfinder. It ranges from three stops under to three stops overexposed.

Practice Until It’s Second Nature

I hope I was able to make your DSLR a bit more familiar to you. I know it is a lot of information to take, but don’t be afraid to go deeper. After a while, you will automate the processes and will learn to use the camera intuitively as an extension of your eye and hand. It takes a lot of practice but everybody started where you are today. It’s just a matter of putting in the hours.

The secret is to enjoy the process and not stress over it! After all, digital photography doesn’t cost much after the initial camera investment.